Preparing Exterior Windows For Painting

Getting preparations ready painting exterior windows? Giving you a list everything you'll need, painting valuable windows outside. Prepare painting exterior window frames & sills also. You will learn best paint to use on your exterior windows, so you don't have to replace them.
Preparing Exterior Windows For Painting Outside

Prepare getting all tools, paint equipment, sundries needed for this important outside, home improvement task.
This is an exciting update, preserving, updating windows outside, completing exterior surfaces. Lining up everything you need to know, painting time honored exterior windows.
Having painted windows inside and out countless times, giving you all our trade secrets.
Exterior Window Paint Preparations For An Ideal, Safe Job

Prepare painting exterior windows, count on spending at least an hour or more, per window doing this correctly. If time is a factor, you might want to wait until you have ample time to give all your windows, say over course of a weekend. Because let's face it, starting, stopping, setting up multiple times takes much longer, than working straight through this task.
Now you've set a painting schedule having all of your exterior window frames, sills, & sashes painted, you'll need a list of tools. Proper tools makes this go as easy as it can. Prepare gathering all these up from your garage, pulling out of your tool box. Listing complete range of tools later in article.
First Prep Is Screen Removal
After gathering up all your paint equipment, you'll need to remove all screens, placing them in a safe spot, to reinstall afterwards. If you have many, good idea placing a piece of masking tape on each one, labeling them. Makes re-installation much easier.
Great idea having a quality ladder extending at least 2' higher than any area you'll be working on, first important piece of equipment you'll need.
Once screens are removed, time to rinse off all window surfaces, either by lightly pressure washing, or a forceful garden hose spray. Removing bird droppings, or other foreign matter, scrubbing using a soft bristle brush recommended.
Clean Windows & Screens Before Painting

This is a great time to carefully clean screens too. Using mild soap, soft bristle brush, & low pressure water, screens come clean nicely.
Be sure letting windows dry, normally 24-48 hours, before any scrapping, caulking, or priming is done. This way you will not be trapping any moisture in cracks or crevices.
Having something clean to start working with is best, making end result that much more pleasing. Not to mention easier while you're working on them. Like masking tape will adhere properly, than to dirt & grim.
Tools & Equipment Needed Painting Windows
- Sharp razor knife, extra blades
- Scrapers, 5 way painter's tool
- Good sturdy ladder 2' higher than tallest window
- Drop cloths, plastic sheathing, masking materials
- Quality Paint brushes, rollers, or spray equipment
- Bucket with hook, hooking on ladder, as a tool box
Preparation Steps Painting Your Exterior Windows

Now you've got all widow screens removed, windows cleaned, it's time to run through preparation steps, painting those windows outside. Best tackling upper windows first, due to any falling matter below, possibly sticking on fresh paint on lower windows.
Remember having a ladder available, which extends at least two feet above height of area you are working, making sure angle & footing is secure.
Using a bucket with a secure hook attached near top of ladder rung, provides a handy tool carrier with a wide range of tools & sundries needed. This is much more convenient, not needing to come down each time getting something else, using entire window painting process. Know you're gonna thank me for this tip.
- Remove, clean screens
- Making any repairs, replacements
- Scraping any loose paint mils
- Fill any missing paint with Spackle
- Sand fillers or patching compounds smooth
- Use correct painter's caulk
- Prime window frames, sills, and sashes
- Mask any areas not receiving paint coatings
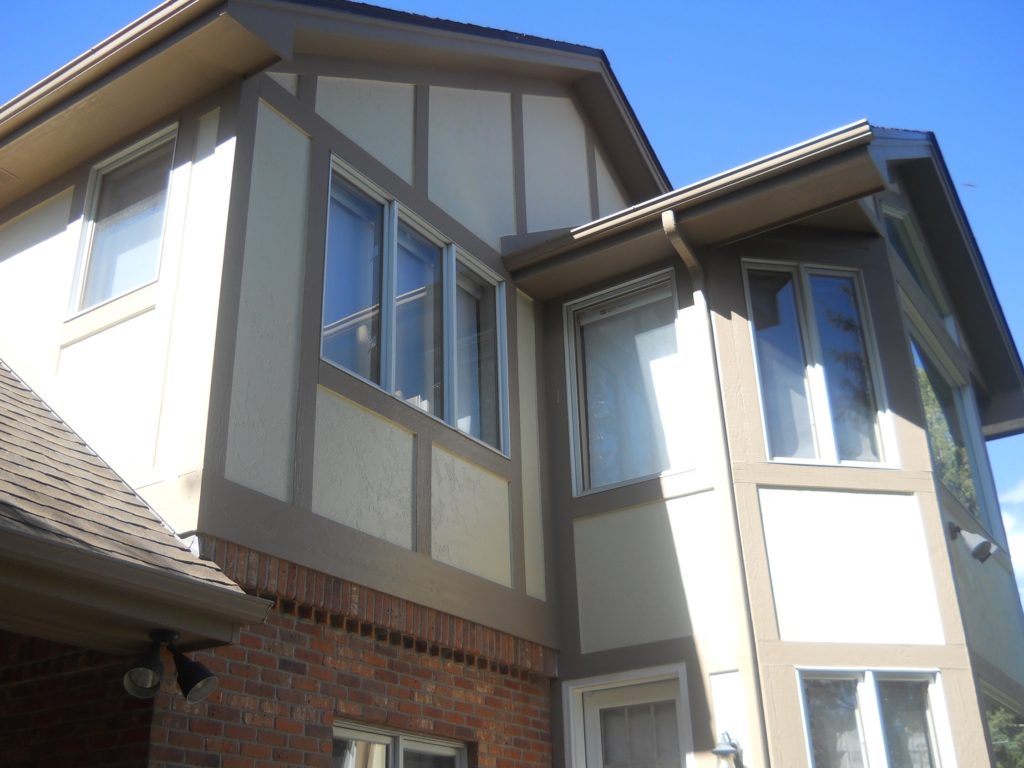
Repair & Replace Window Trim

Just as important cleaning windows is, also repair and/or replace is important to most window functions. Carefully inspect every area of window tracks, slides, also seals. This is a great time making any necessary repairs, replacing any trim if needed.
Once trim is replaced, there are important tips knowing cost to paint exterior trim you probably should familiarize yourself with.
Ideally, using exact same building materials when making any repairs, replacing any items, using same part numbers.
This is an ideal time to make any repairs, before painting window frames takes place.
Scraping Any Loose Paint & Caulk
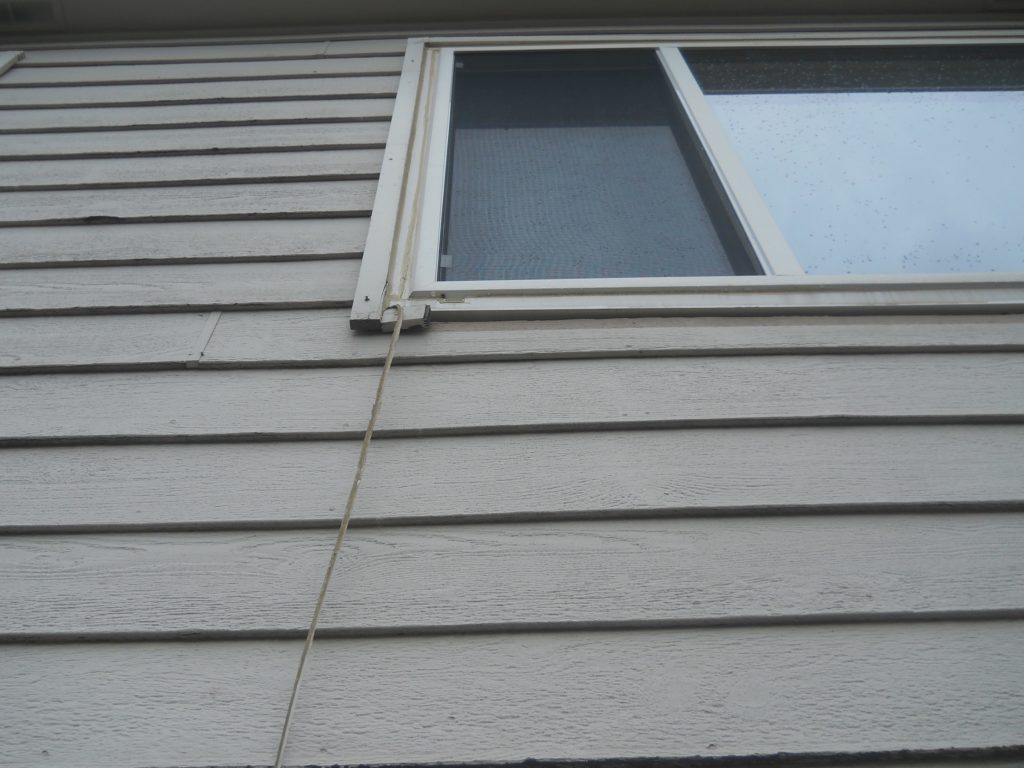
Using a sharp flat 5 way painter's tool, or 2 inch putty knife on painted window surfaces, lifting up loose paint currently not adhering, is vitally important.
Tooling your 5 way painter's tool around window frames, and sills. Just like a dental assistant does, checking for tarter, with a dental tool. Tapping questioned areas, listening for any empty sounds. If tapping sounds hollow, with air in between, it's time to scrape this old paint away. Removing all loose paint before picking up any caulking gun.
Use Fillers Where Any Paint Is Removed

Areas where only a small area of paint has been removed, scraped way, an exterior Spackle can be troweled on, sanding after it has dried, leaving a perfectly smooth surface to paint later. Crawford's Exterior Spackle is product of choice for this, filling voids and unevenness.
Sand Dried Fillers, Putty, Or Bondo

Every professional exterior paint job will require sanding paint edges where chips were removed, and old paint is remains. This thickness difference is the actual paint mil, normally 9-14 mils or 9/1000th of an inch.
Second reason why you need to sand fillers before painting exterior windows is where you have used any exterior Spackle, painter's putty, or fillers are not as smooth as need be once painted.
If fillers are not sanded to a smooth feathered transition, get ready to see them later. So, if doing this yourself, good idea having plenty of elbow grease plus drinking water on hand. Do not want to get over-heated.
Use Correct Caulk On Window Frames

After scraping all loose paint from window edges where they meet siding, any window trim, it's time to start caulking. Using razor knife, cut old caulk away, discarding. Doing this a lot, replace razor blades frequently. They become dull quickly, plus brand new ones cuts much better, also safer to use.
Once all old caulk has been removed, it's time to re-caulk same areas. Using a quality quick dry siliconized latex painter's caulk is your number one sealer. Caulking any 90 degree edges where trim boards meet windows. Running a fine even bead of caulk, using long caulking strokes.
Either smoothing new caulk using your index finger, or wet rag, wiping fresh new caulk, pressing into cracks.
An average window requires at least one tube of caulk, depending how wide crack joints are. Make sure caulk you are using is paint-able, painters caulk, knowing some caulk is not paint-able. We typically use Sherwin-Williams 950A Siliconized Acrylic Latex Caulk 55 yr. on most applications.
If we are painting a home which is having windows installed, we tell the homeowner to tell the window company to do not pick up a caulking gun, or we cannot warranty the paint job. As they are notorious using cheap, clear non-paintable caulk.
Prime Windows

Anywhere you have repaired, scraped, sanded, or caulk needs high bonding primer.
Great to know primer bonds to bare wood much better than exterior paint coatings. Exterior paints bonds to primers much better than bare wood, so makes perfect sense to prime exterior window surfaces first, before applying final paint coats. This helps seal surfaces, thereby allowing a fresh coat of paint applied 24 hours later.
Masking Exterior Windows
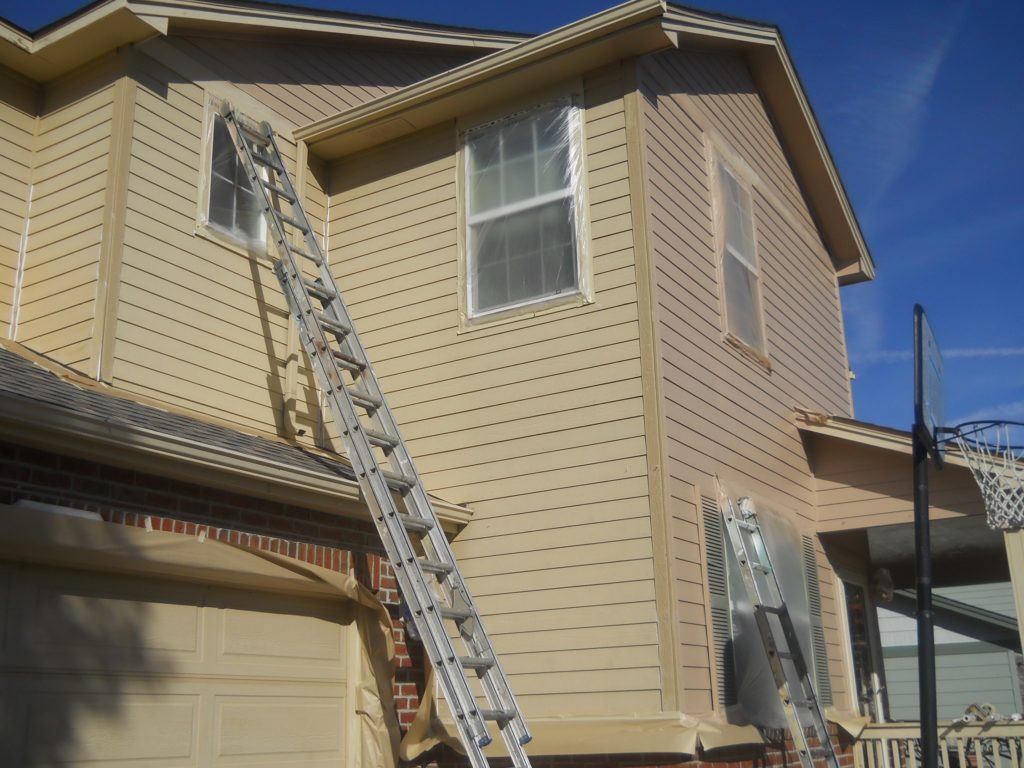
Your almost done with window painting preparations, just needing to mask, covering all areas not to receive fresh new paint. Using 1 1/2" painter's masking tape, brown paper, 3M masker, and drop film. If spraying, be sure to cover window glass completely. Making sure cars are not near windows being painted.
Everything around exterior window trim should be covered with 3M™ Drop Film, Brown masking paper, visqueen or disposable plastic sheathing if only painting windows. If painting entire home, it's OK to over-spray trim to siding.
Some painters use brown masking paper around the sides of all windows, folding the corners like a gift package, carefully creasing edges. If plastic was not used in the centers of the window, and a gust of wind caught the paint spray a certain way, someone would be cleaning paint over spray off exterior windows! So best cover window glass completely.
Painting Exterior Window Frames & Sills

Once you've completed all above tasks, everything is ready to start applying final paint coatings on your window frames and sills.
All paint manufactures suggest, applying two complete coats, wet on dry paint application. Generally waiting 24 hours between coats. It may be possible a little quicker, depending how fast exterior paint sets up, dries properly.
Window frames are exposed to outside elements, also very expensive to replace, so applying two complete coats after steps mentioned above is necessary. Sills being part of window frames, taking utmost care with them also means everything.
After you've applied two paint coatings, then it's time to remove masking materials, not a second before.
Best Paint To Use For Exterior Wood Windows
As promised, saving the best for last. Letting you in on our little secret, which paint is designed for exterior wood windows. Like a coating protecting your windows a lifetime, you guessed it, lifetime exterior paint.
My winner is Sherwin-Williams™ Emerald® without question.

Sherwin-Williams Emerald® paint and primer in one with advanced stain blocking technology delivers best-in-class overall performance. To ensure a beautiful, smooth finish and stunning color for years to come, use our finest paint ever. Emerald prevents stains from penetrating, offers maximum resistance to water streaking and spotting, features truly remarkable hide and covers dark colors. With exceptional coverage and washability, it’s perfect for any paint job. Now Available: Emerald Interior flat finish with excellent washability. Emerald is available in four sheens, including a technologically advanced flat finish that offers the same washability, durability and burnish resistance as the matte or glossier sheens. The flat finish hides minor drywall imperfections while providing a washable, rich look. With Emerald Interior Flat, there is no need to sacrifice performance for appearance. Matte and Satin finishes are now available in a high hiding accent base, formulated to boost hiding power and deliver truer colors in fewer coats.
Not only does Sherwin-Williams™ Emerald® win Best exterior paint brand for 2019, so does it win Best interior paint brand. Best in both categories inside & out for your home, looking like new.
Following list of preparations listed above, you will have mastered painting exterior window frames and sills preserving many years to come, not having to replace costly windows.
Hope this has been beneficial, and if so, please like, share, ping, and/or comment below.


[…] This is a very important phase in a home's painting preparation. Much easier to remove masking, than cleaning afterwards, especially if preparing exterior windows for painting. […]
[…] tip finding paint to scrape is with windows. Checking for potential paint removal. Reason to really pay attention to these areas, is because of […]
[…] away, keeping spray tip at least 3-4' away. If using Red single stream tip, back even further. Preparing any wood windows for painting, this is first step you need to […]
[…] Remembering primer bonds to bare wood much better, this is even more important preparing wood windows for painting. Wooden framed windows far more expensive than siding, so any bare wood on your window frames needs an extreme bonding primer first. […]
[…] preparations windows before painting is key. Making sure your renowned exterior window paint last many […]
[…] you can see, prepping exterior wood windows for painting can eat up the clock too, especially on second or third […]
[…] have wood windows facing outside, much attention needs to be given just in this area alone. Proper preparations needed for wooden windows, priming first, insuring they last the duration of paint's warranty. Just windows alone may require […]
What language was this Google-translated from?